Following on from our article about running Windows 7 within Microsoft Virtual PC, this tutorial will show you how to run Windows 7 by using the more powerful VirtualBox application. VirtualBox is an open-source tool from which you can create a virtual computer, enabling you to run a separate operating system within your existing OS. In this example, the host PC is running Windows Vista.
To get started you will need to download the latest version of VirtualBox from:
http://www.virtualbox.org/wiki/Downloads
Proceed to install VirtualBox to the desired location, and then start the application. Once it has loaded, click the “new” button to begin the new virtual machine wizard:

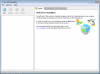
Click “next” once you have read the introduction text:
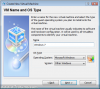
You can now enter a name for your Virtual installation. In this example we have chosen “Windows 7” and selected the “Other Windows” version, as the current version of VirtualBox does not list W7. Once you have done this, click “next”:
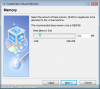
Now choose the amount of RAM you wish to dedicate to the virtual PC. 512MB is the minimum, and a sensible value to start with (if you have plenty of memory, you could try 1024MB). Then click “next”:
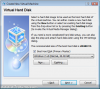
A virtual hard disk file is needed to store the OS. Click “new” to create a dynamically expanding storage file in a location of your choice. 20GB is a sensible value for a test operating system, assuming you have plenty of spare drive space. Once you have returned to the completed VHD menu, click “next”:
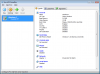
The initial setup is now complete, click “finish” to complete the installation. The main VirtualBox menu will then be displayed, where you can launch the virtual PC or change settings. To configure the Windows 7 VPC, slick “settings”:
To get the most out of the Windows 7 virtual PC the following configuration changes are recommended:
To get started you will need to download the latest version of VirtualBox from:
http://www.virtualbox.org/wiki/Downloads
Proceed to install VirtualBox to the desired location, and then start the application. Once it has loaded, click the “new” button to begin the new virtual machine wizard:
Click “next” once you have read the introduction text:
You can now enter a name for your Virtual installation. In this example we have chosen “Windows 7” and selected the “Other Windows” version, as the current version of VirtualBox does not list W7. Once you have done this, click “next”:
Now choose the amount of RAM you wish to dedicate to the virtual PC. 512MB is the minimum, and a sensible value to start with (if you have plenty of memory, you could try 1024MB). Then click “next”:
A virtual hard disk file is needed to store the OS. Click “new” to create a dynamically expanding storage file in a location of your choice. 20GB is a sensible value for a test operating system, assuming you have plenty of spare drive space. Once you have returned to the completed VHD menu, click “next”:
The initial setup is now complete, click “finish” to complete the installation. The main VirtualBox menu will then be displayed, where you can launch the virtual PC or change settings. To configure the Windows 7 VPC, slick “settings”:
To get the most out of the Windows 7 virtual PC the following configuration changes are recommended:
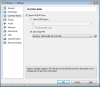
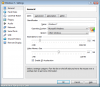
- Increase the Video Memory to 64MB and enable 3D acceleration
- Enable audio, and change driver to “Windows Direct Sound”
- Change network adapter to “Intel PRO/1000 MT Desktop”
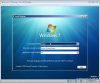
Once these changes have been made, click “ok” to return to the main screen. Then, click “start” (or double click the Windows 7 icon). This will boot the virtual PC and automatically load the Windows 7 setup menu if you have correctly mounted the installation DVD:
You can then proceed to install Windows 7 as if it was a real PC, safe in the knowledge that it is all done in a virtual environment that won’t interfere with your normal boot OS. If you are an advanced user and wish to install the Guest Additions package, make sure you do this in Vista Compatibility mode for it to work.
Attachments
-
 38.4 KB Views: 62,345
 -
 46.6 KB Views: 62,731
 -
 71.5 KB Views: 62,605
 -
 61.5 KB Views: 62,865
 -
 70.9 KB Views: 66,194
 -
 59.3 KB Views: 63,704
 -
 61 KB Views: 63,306
 -
 61.7 KB Views: 64,049
 -
 53.7 KB Views: 83,060