Nibiru2012
Quick Scotty, beam me up!
- Joined
- Oct 27, 2009
- Messages
- 4,955
- Reaction score
- 1,302
Many of us at one time or another had to do a new or a reinstall of the Windows 7 Operating System.
This tutorial deals with installing the INTEL INF drivers to your system’s INTEL motherboard chipset such as the ICH10R and other ICHXXX chipsets.
1. When you go to the INTEL website, in the INTEL INF driver download section there will listed two downloads available. One is strictly an “exe” file or executable. The other is in a ZIP file with the executable and associated folders for that version of the INF driver. The INTEL website states the ZIP file is for developers only, in reality that is misleading. I ONLY use this setup due the way my motherboard’s chipset recognizes the INTEL INF driver. If one solely relies on the “exe” file, depending upon the chipset and the motherboard, it may not always install the drivers correctly even though it went through the install process and a reboot occurred.
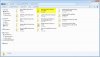
2. Using the extracted ZIP file will create a folder as shown, I have renamed it so I may recognize it easier for my own purposes. You may rename however you wish, just be sure the version numbers are listed. See this image:

You’ll notice I’ve highlighted the folder we’ll be discussing here for the remainder of this article.
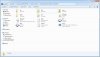
When you open the folder you’ll see some folders containing their respective drivers, some text files and an executable file too.
3. You may “Copy & Paste” this folder to your main ‘C’ drive for the purpose of doing the driver install, then delete it later, if you wish.
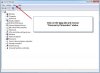
4. Then you want to go to “COMPUTER” and right-click on it. Then choose “Properties”, then choose “Device Manager”, then click on the “View” menu selection at the top of the window. See the Info Box in the attached image:
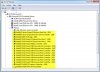
5. You will then see a window that looks like the following image after expanding the tree and choosing the PCI Bus section:
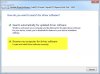
6. Starting with the first listing high-lighted (Intel 4 Series Chipset PCI Express Root Port), right-click on it and select “Update Driver” and you’ll see a window appear that looks like this:
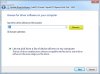
7. Click on the “Browse my computer for driver software” and you’ll see the next image:
8. BE SURE the check for “Include subfolders” is showing and then click on the browse button and direct it to the INTEL INF folder that you copied to your ‘C’ drive. After the proper folder is selected, then click on the blue “Next” button. The search will then examine ALL files in the folder, the appropriate driver(s) selected and then updated.
9. You may have to reboot a few time times after some of the driver updates, Windows 7 will tell you when it’s necessary. Then just start the update process with the remaining items, starting as stated at the beginning of this section.
10. You will have to do each section shown, yes even every USB port that’s listed. This will ensure that all USB ports have the correct USB driver loaded for them. IF you get a response stating that “Windows is using the most current driver” then don’t worry and continue on to the next section. Windows 7 will update if a later up-to-date driver is needed.
11. If your using the AHCI function chosen in the motherboard’s BIOS settings, then it may show a Microsoft driver from 2006. To update it, direct the update to the INTEL RST Drivers folder and you’ll need to reboot after that update, and may need to reboot again. Just do what Windows 7 tells you regarding that and you’ll be good.
You’ll now experience a faster, more responsive Windows 7 installation. If you have any questions or comments, please post them here. Feedback is always good for the forum.
This tutorial deals with installing the INTEL INF drivers to your system’s INTEL motherboard chipset such as the ICH10R and other ICHXXX chipsets.
1. When you go to the INTEL website, in the INTEL INF driver download section there will listed two downloads available. One is strictly an “exe” file or executable. The other is in a ZIP file with the executable and associated folders for that version of the INF driver. The INTEL website states the ZIP file is for developers only, in reality that is misleading. I ONLY use this setup due the way my motherboard’s chipset recognizes the INTEL INF driver. If one solely relies on the “exe” file, depending upon the chipset and the motherboard, it may not always install the drivers correctly even though it went through the install process and a reboot occurred.
2. Using the extracted ZIP file will create a folder as shown, I have renamed it so I may recognize it easier for my own purposes. You may rename however you wish, just be sure the version numbers are listed. See this image:
You’ll notice I’ve highlighted the folder we’ll be discussing here for the remainder of this article.
When you open the folder you’ll see some folders containing their respective drivers, some text files and an executable file too.
3. You may “Copy & Paste” this folder to your main ‘C’ drive for the purpose of doing the driver install, then delete it later, if you wish.
4. Then you want to go to “COMPUTER” and right-click on it. Then choose “Properties”, then choose “Device Manager”, then click on the “View” menu selection at the top of the window. See the Info Box in the attached image:
5. You will then see a window that looks like the following image after expanding the tree and choosing the PCI Bus section:
6. Starting with the first listing high-lighted (Intel 4 Series Chipset PCI Express Root Port), right-click on it and select “Update Driver” and you’ll see a window appear that looks like this:
7. Click on the “Browse my computer for driver software” and you’ll see the next image:
8. BE SURE the check for “Include subfolders” is showing and then click on the browse button and direct it to the INTEL INF folder that you copied to your ‘C’ drive. After the proper folder is selected, then click on the blue “Next” button. The search will then examine ALL files in the folder, the appropriate driver(s) selected and then updated.
9. You may have to reboot a few time times after some of the driver updates, Windows 7 will tell you when it’s necessary. Then just start the update process with the remaining items, starting as stated at the beginning of this section.
10. You will have to do each section shown, yes even every USB port that’s listed. This will ensure that all USB ports have the correct USB driver loaded for them. IF you get a response stating that “Windows is using the most current driver” then don’t worry and continue on to the next section. Windows 7 will update if a later up-to-date driver is needed.
11. If your using the AHCI function chosen in the motherboard’s BIOS settings, then it may show a Microsoft driver from 2006. To update it, direct the update to the INTEL RST Drivers folder and you’ll need to reboot after that update, and may need to reboot again. Just do what Windows 7 tells you regarding that and you’ll be good.
You’ll now experience a faster, more responsive Windows 7 installation. If you have any questions or comments, please post them here. Feedback is always good for the forum.
Attachments
-
 34.4 KB Views: 5,203
 -
 27.3 KB Views: 4,967
 -
 38.7 KB Views: 5,042
 -
 68 KB Views: 13,143
 -
 41.7 KB Views: 5,225
 -
 38.6 KB Views: 5,270