Using a network drive is very common in a workplace, but now also in a home environment where a NAS (Network Attached Storage) device is used. This can be great for storing files that are shared between PCs and other network enabled products.
You can manually browse for a network share using Windows Explorer, but this can take some time. It is often much more convenient to map a network share to a drive letter. For example \\NETWORKDRIVE\Photos can become your new Z:.
To begin, load Windows Explorer (press Windows Key + E) and click the Map Network Drive button:

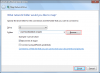
Now, select a drive letter that you wish to map the network share to. Then click Browse to find the network location. If you require a username and password to connect, you will now be prompted. Once done, click Finish:
Your new network drive is now mapped! You can load up Explorer and browse the network share just like any other drive now, making it much easier to find.
You can manually browse for a network share using Windows Explorer, but this can take some time. It is often much more convenient to map a network share to a drive letter. For example \\NETWORKDRIVE\Photos can become your new Z:.
To begin, load Windows Explorer (press Windows Key + E) and click the Map Network Drive button:
Now, select a drive letter that you wish to map the network share to. Then click Browse to find the network location. If you require a username and password to connect, you will now be prompted. Once done, click Finish:
Your new network drive is now mapped! You can load up Explorer and browse the network share just like any other drive now, making it much easier to find.
Attachments
-
 6.1 KB Views: 4,044
 -
 12.7 KB Views: 4,555