Performing a repair install on Windows 7 is one of the last steps you can take to rectify a problem with the operating system. Unfortunately, the repair install process is somewhat limited in comparison with previous versions of Windows as you are only able to initiate the repair install from within an existing Windows 7 installation. This is no use if you aren't able to boot due to an error (in which case a startup repair may help).
It is also recommended that you temporarily disable an anti-virus package/firewall running in the background to prevent it interfering with the install process.
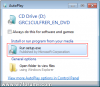
To begin the repair install, load Windows 7 and make sure you are logged in to an administrator account. Then, insert the Windows 7 DVD and run the setup.exe file from the autoplay menu:

Then click Install Now to begin the process:
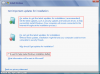
Now untick the "I want to help make Windows better" box and select the Go online to get the latest updates for installation option:
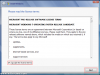
The installation process will then search online for any available updates, which may take a few moments. Once complete, read through the license agreement, then tick the accept box and click Next:
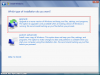
Now click the Upgrade box to begin the repair install of Windows 7:
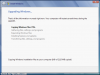
Windows will then re-install Windows 7 over the top of itself, and will inform you of it's progress as it does this. Your PC will restart a couple of times during this process:
Once rebooted, you are then prompted to enter the usual initial install details (such as the license key, localisation and time settings). When this is complete, the repair install has been fully performed.
It is also recommended that you temporarily disable an anti-virus package/firewall running in the background to prevent it interfering with the install process.
To begin the repair install, load Windows 7 and make sure you are logged in to an administrator account. Then, insert the Windows 7 DVD and run the setup.exe file from the autoplay menu:
Then click Install Now to begin the process:
Now untick the "I want to help make Windows better" box and select the Go online to get the latest updates for installation option:
The installation process will then search online for any available updates, which may take a few moments. Once complete, read through the license agreement, then tick the accept box and click Next:
Now click the Upgrade box to begin the repair install of Windows 7:
Windows will then re-install Windows 7 over the top of itself, and will inform you of it's progress as it does this. Your PC will restart a couple of times during this process:
Once rebooted, you are then prompted to enter the usual initial install details (such as the license key, localisation and time settings). When this is complete, the repair install has been fully performed.
Attachments
-
 27 KB Views: 35,757
 -
 26.6 KB Views: 34,182
 -
 72.4 KB Views: 34,202
 -
 65.9 KB Views: 35,427
 -
 79.8 KB Views: 42,520
 -
 61.7 KB Views: 34,165